Article
How to set up GA4 export for BigQuery
Benefits of Using BigQuery and Google Cloud with GA4
- Report on more than 14 months of data
- Bypass GA4 quota limits when connecting to Data Studio. (Google is imposing strict limits on the number of data requests users can process when connecting their GA4 account to Data Studio for reporting. Connecting Data Studio to BigQuery rather than GA4 will avoid these limits entirely).
- Enable better pathing, assisted conversion tracking, and other complex tracking
How to Connect GA4 to BigQuery
Set Up Google Cloud Account and Project
Add Billing Account for the Full BigQuery Experience
Set Up Google Cloud Account and Project
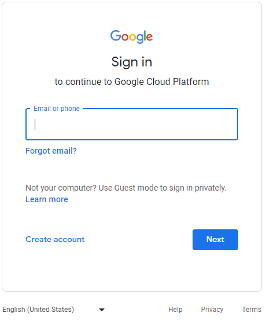
- Log in to the Google APIs Console. You should see the below login window, where you will need to log into an existing Google account or create a new one.
- Once logged in, you’ll be prompted to pick the country and agree to the Google Cloud Platform terms of service. Choose your respective country, click on the checkbox, and then click on AGREE AND CONTINUE.

- You will now see a Welcome screen. From here, click on the 3-line navigation button on the top left next to the Google Cloud text to open the navigation pane. Now hover over APIs & Services and then click on Library.
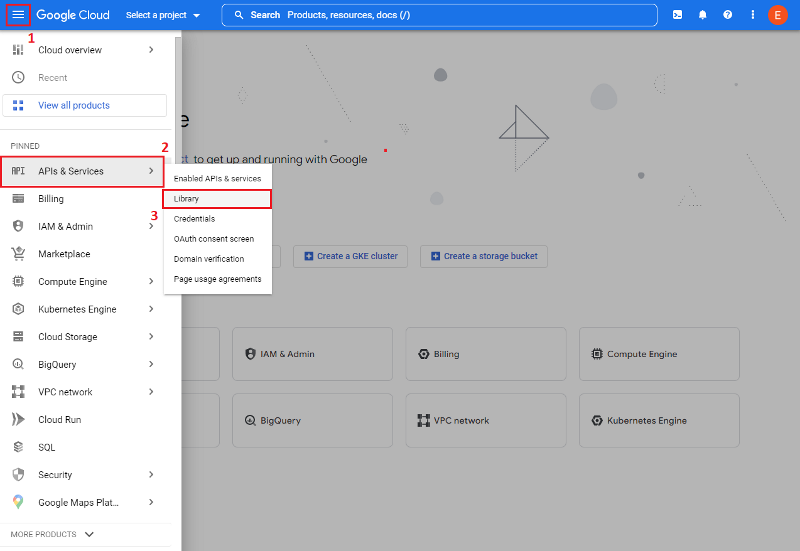
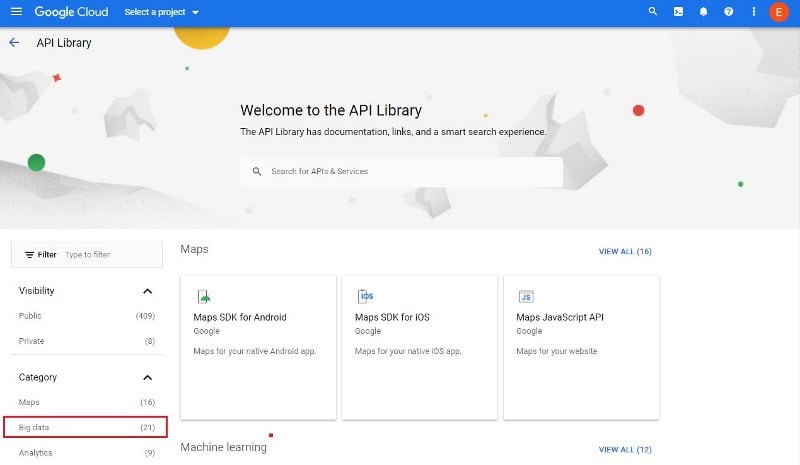
- Click on the Big data category in the left side pane.
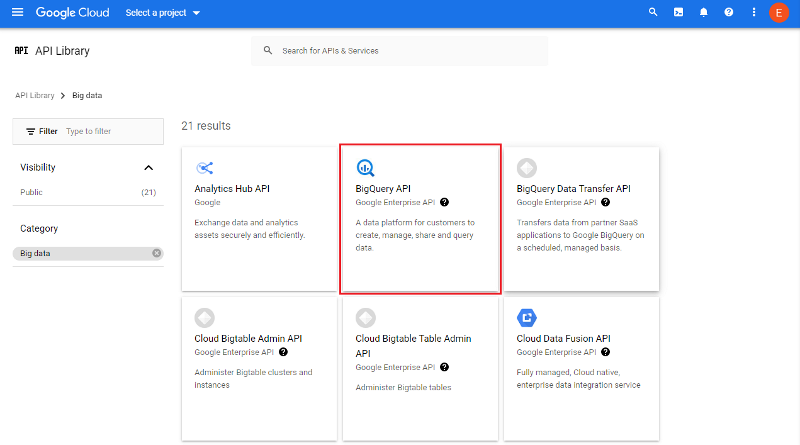
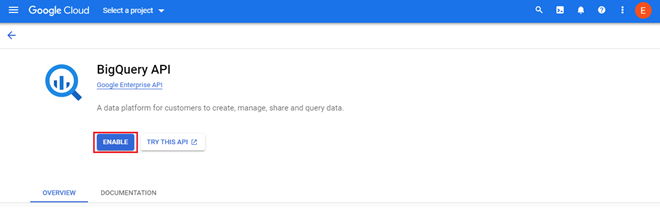
- Click on BigQuery API.
- Click on the ENABLE button.
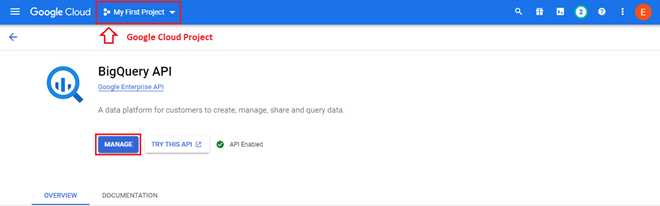
- The ENABLE button should now change to MANAGE, as the API has been enabled. At this point, a Google Cloud Project named “My First Project” should have been created for you as indicated in the dropdown at the top of the page. You can always change the name later. For now, click on the MANAGE button.
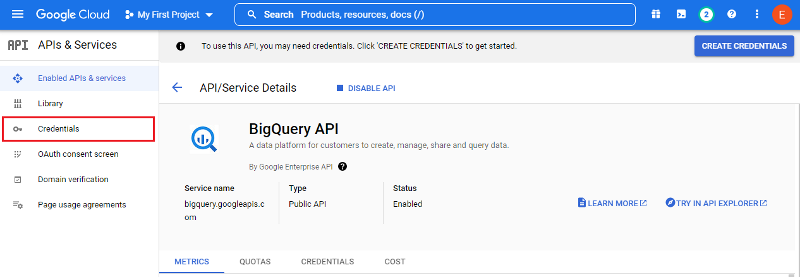
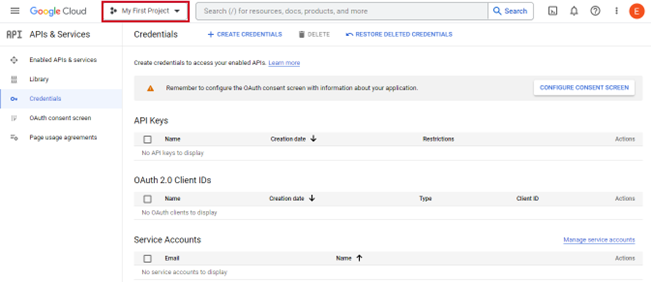
- Click on Credentials in the left side pane.
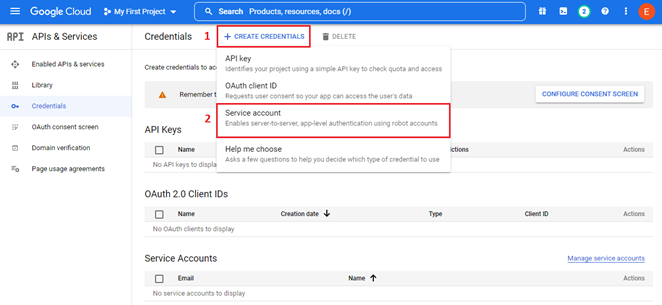
- Click on + CREATE CREDENTIALS button toward the top of the screen and then click on Service account.
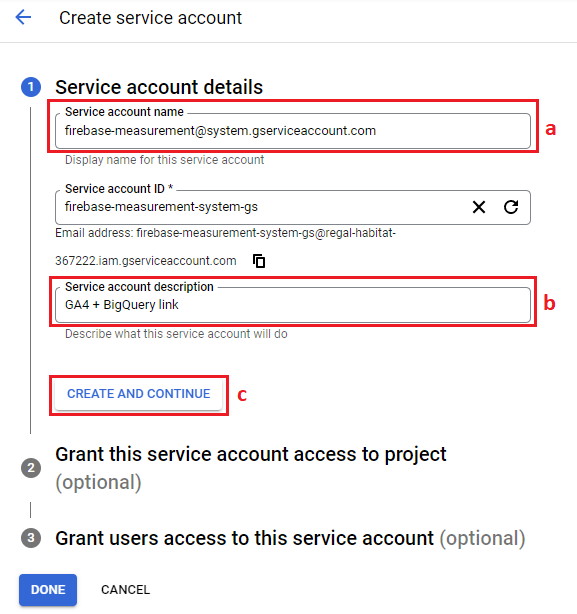
- Create a new service account:
- Copy and paste the following text into the Service account name field: [email protected]
- Fill in a description for the account under Service account description to provide context for anyone looking at this account later. We recommend something simple like “GA4 + BigQuery link”
- Click the CREATE AND CONTINUE button.
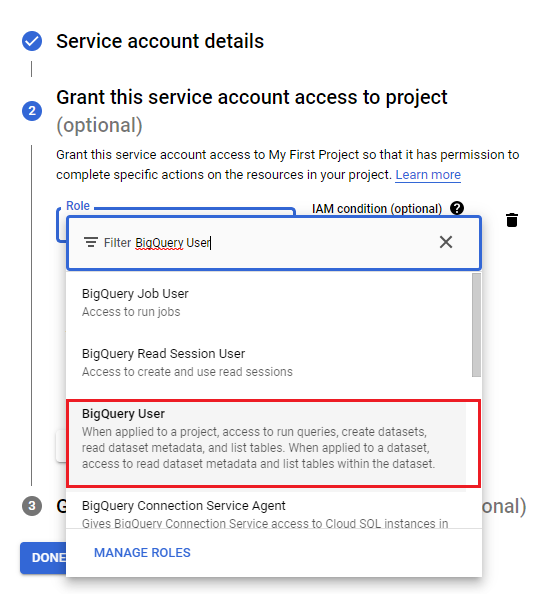
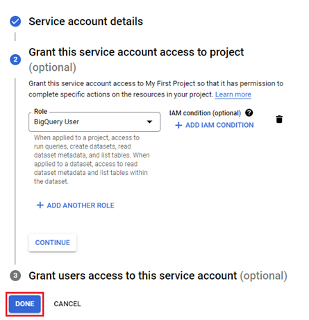
- Click on the Select a role drop-down arrow and type “BigQuery User” into the filter at the top. Click on the BigQuery User option in the results.
- Click on the DONE button on the bottom left.
- The last thing we need to do is update the name of the Google Cloud Project so it has a unique and easily identifiable name. Click on the project drop-down menu at the top of the page.
- Click on the folder icon with the cog wheel inside it.
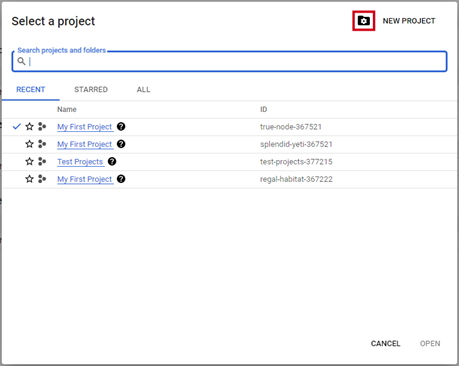
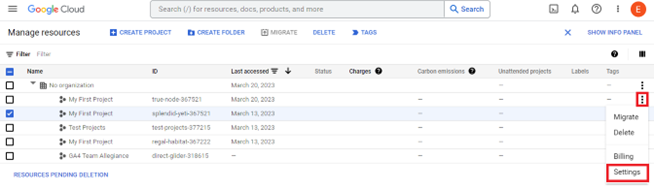
- Click on the 3 dots to the right of the project you want to rename, and click on Settings.
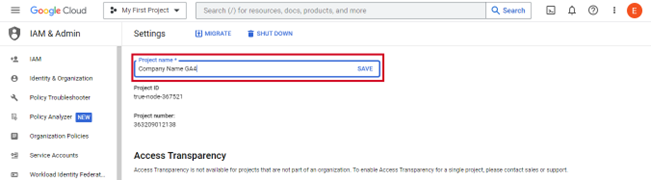
- Change the name of the Project to something like “Company Name GA4”, making sure to replace the words Company Name with your own company. Then click SAVE.
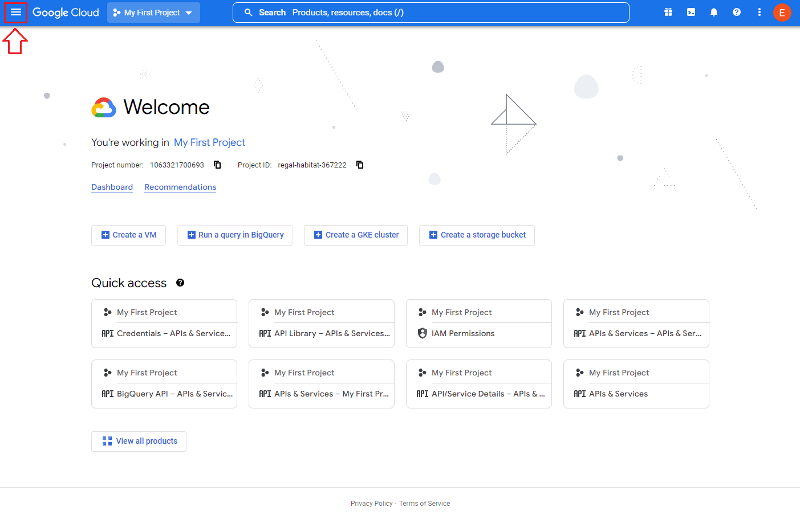
- Now you are ready for the next step in the process, which is upgrading to the full BigQuery experience.
Add Billing Account for the Full BigQuery Experience
- We are first adding a billing account for 2 main reasons:
- To remove the 60-day data retention limit window in the “sandbox” version of BigQuery.
- To have access to real-time data for the current day.
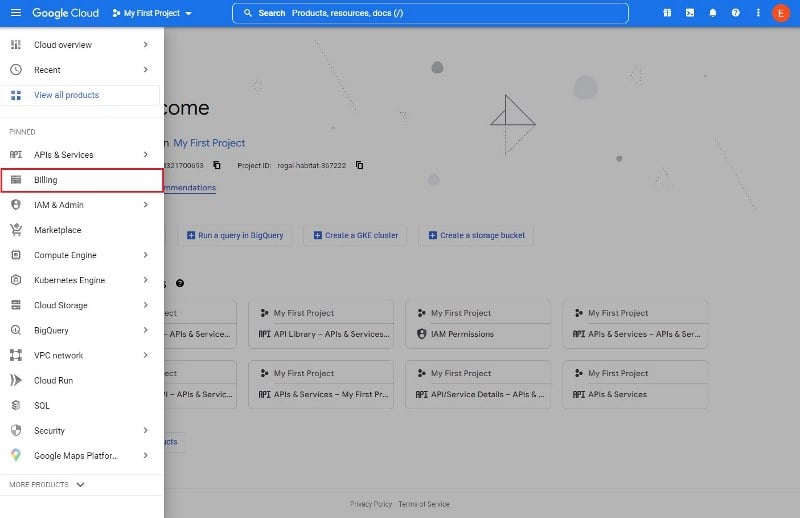
- Open up the Google Cloud Console, and click on the navigation button on the top left.
- Click on Billing.
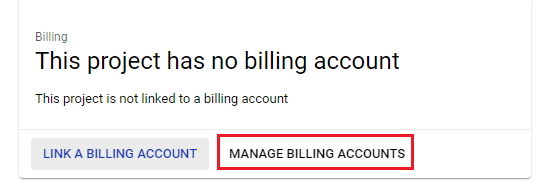
- Click on the MANAGE BILLING ACCOUNTS button.
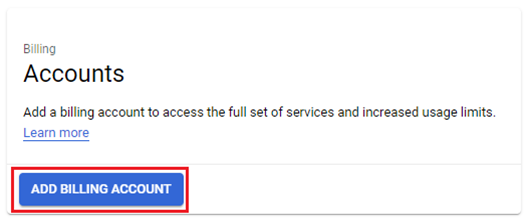
- Click on the ADD BILLING ACCOUNT button.
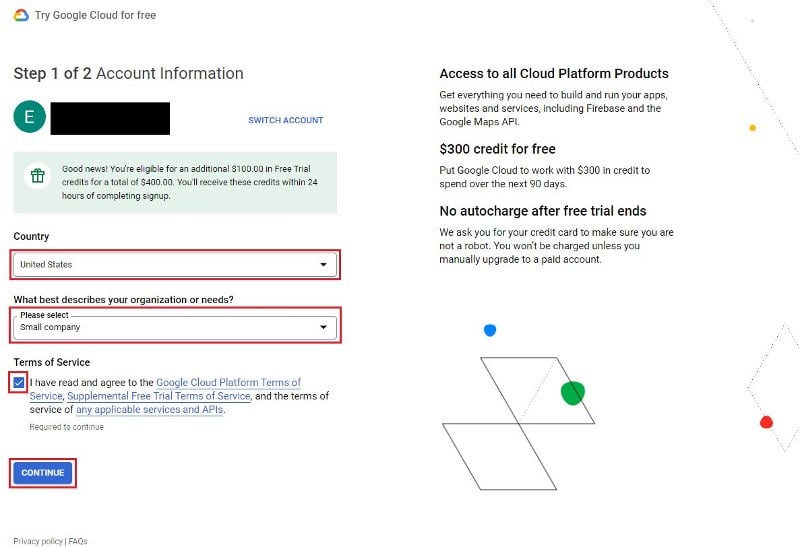
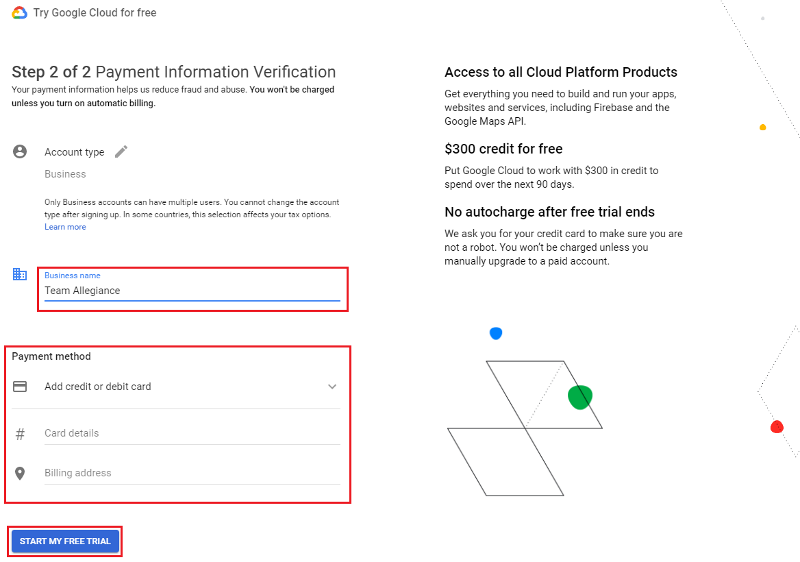
- Select your country of residence, organization size, and click on the Terms of Service checkbox. You might be eligible for an extra $100 in free trial credit if you use your work email. Then click the CONTINUE button.
- Now enter a Business name (your company’s name), credit/debit card info, and billing address. Then click on the START MY FREE TRIAL button.
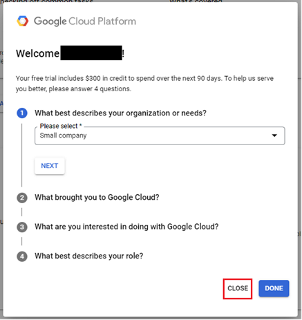
- Click CLOSE.
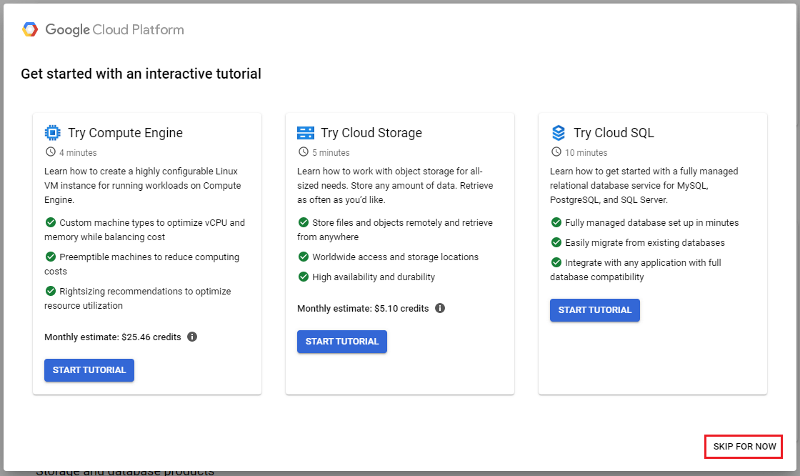
- Click SKIP FOR NOW.
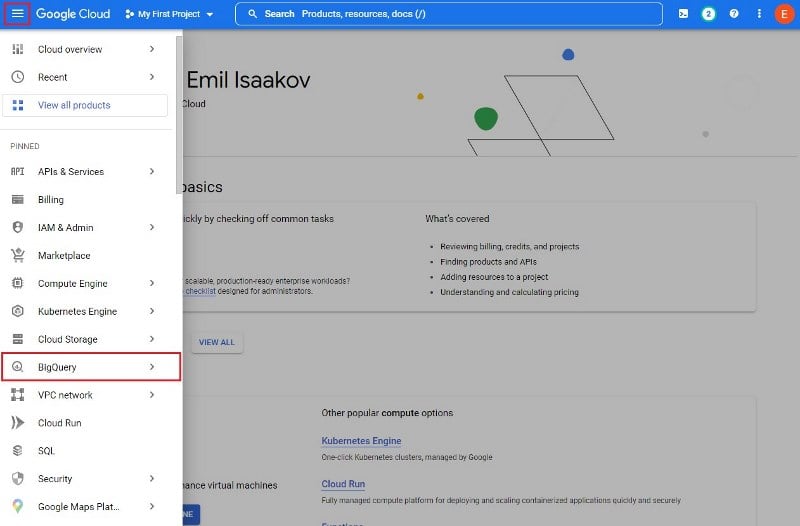
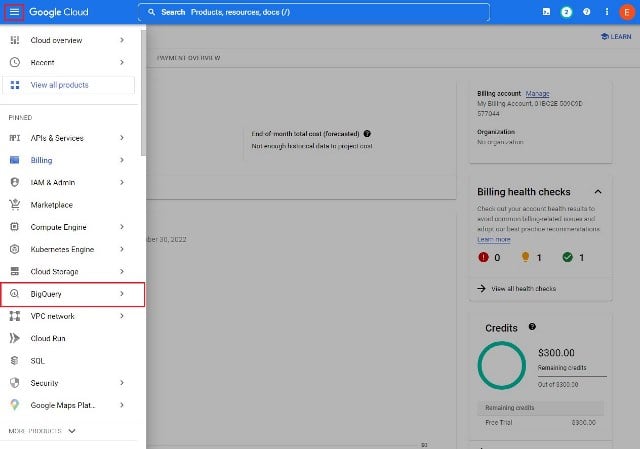
- Now click on the navigation button in the top left of your screen, and then click on BigQuery.
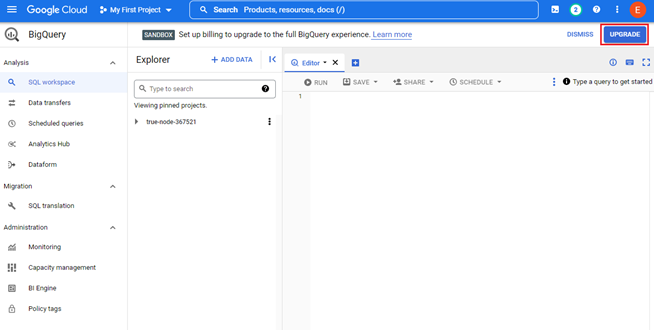
- At the top of the screen, there should be a message prompting you to “Set up billing to upgrade to the full BigQuery experience.“ Click on the UPGRADE button to the right of that message.
- If you do see this message, click on the UPGRADE button to the right of that message.
- If you dont see the UPGRADE button, then you most likely have a billing account on file and can skip to step 17.
- If you do see this message, click on the UPGRADE button to the right of that message.
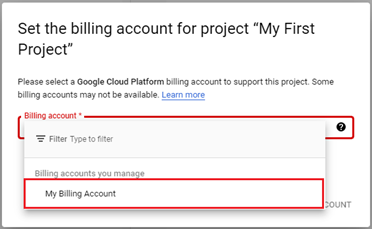
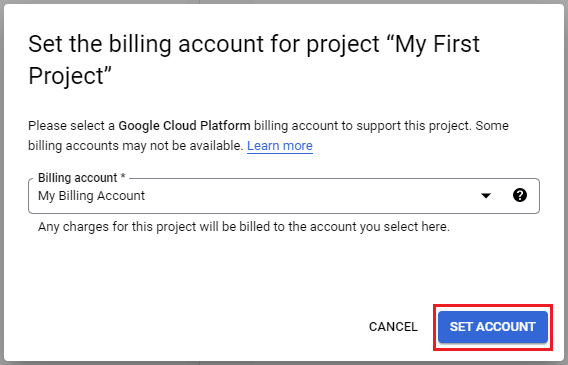
- A window should pop up. Click on the dropdown field, and then click on My Billing Account.
- Click on the SET ACCOUNT button.
- Again, click on the navigation menu on the top left and then on Billing.
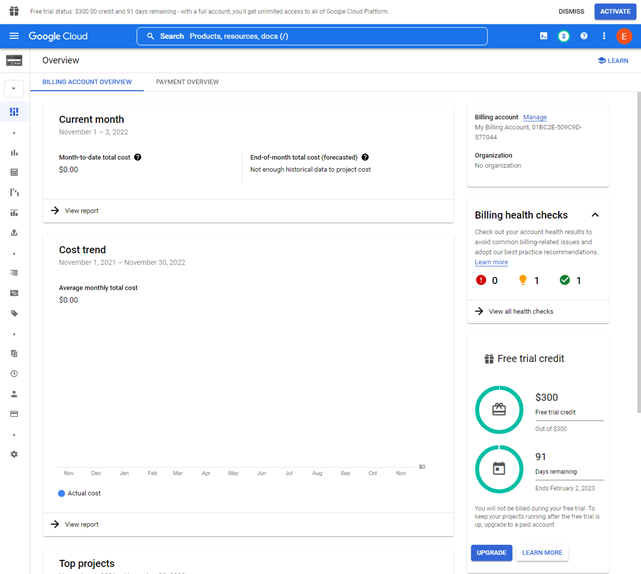
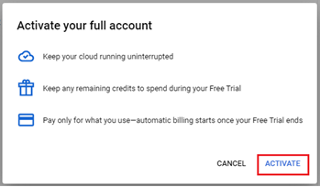
- There should be a banner message on the top indicating how many days in your trial are left, with a set of buttons on the top right. Click either the ACTIVATE button or the UPGRADE button on the bottom right of the page.
- Click on the ACTIVATE button on the window that pops up. Then click the CONTINUE button.
- Click on the navigation menu on the top left and then on BigQuery.
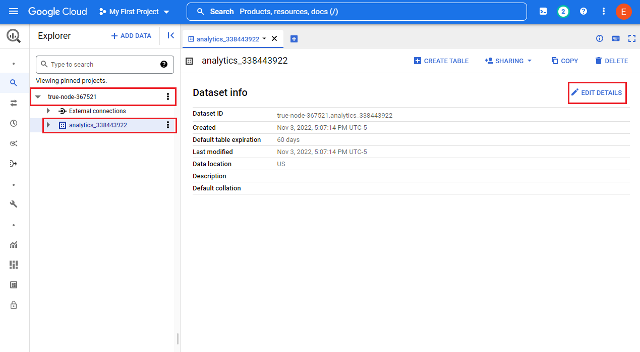
- First click on the project in the Explorer pane. If a day has passed after linking your GA4 account to BigQuery, you should have a dataset named something along the lines of “analytics_######”. The # symbols will be replaced by actual numbers. This is your GA4 dataset.
Click on the GA4 dataset and then click on EDIT DETAILS on the top right of the window to the right.
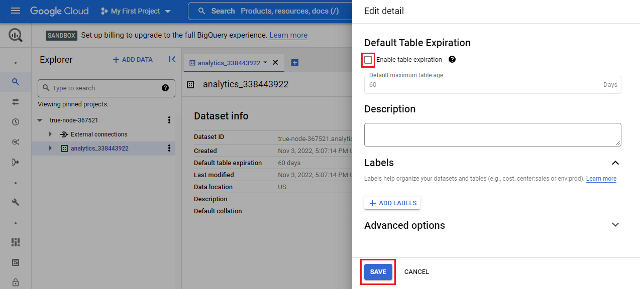
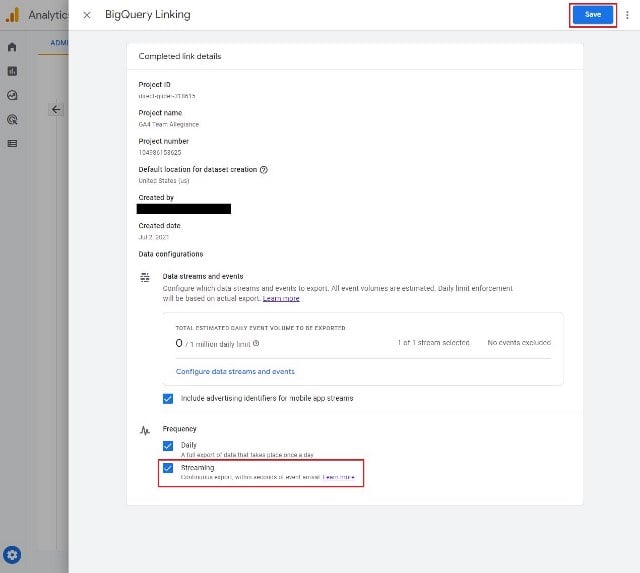
- A new window pane should open up on the right. By default, the GA4 dataset will have a table expiration of 60 days, but now that you have billing info in place, you can remove that expiration limit. Click on the checkbox next to “Enable table expiration” to uncheck it, and then click on the SAVE button.
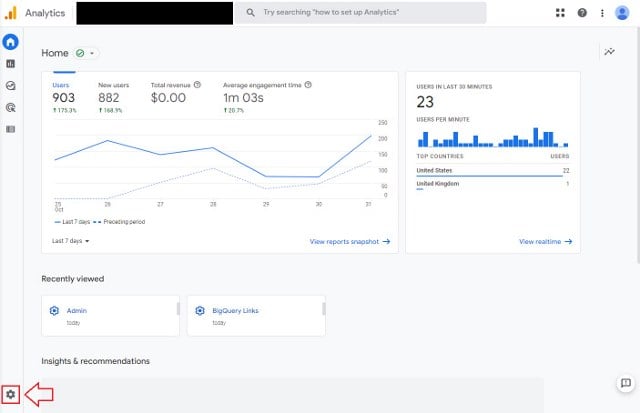
- Your GA4 data should now no longer expire. If you would like to see another data table for real-time data (data for today), start by opening your GA4 property again. Then click on the Admin “cog” on the bottom left.

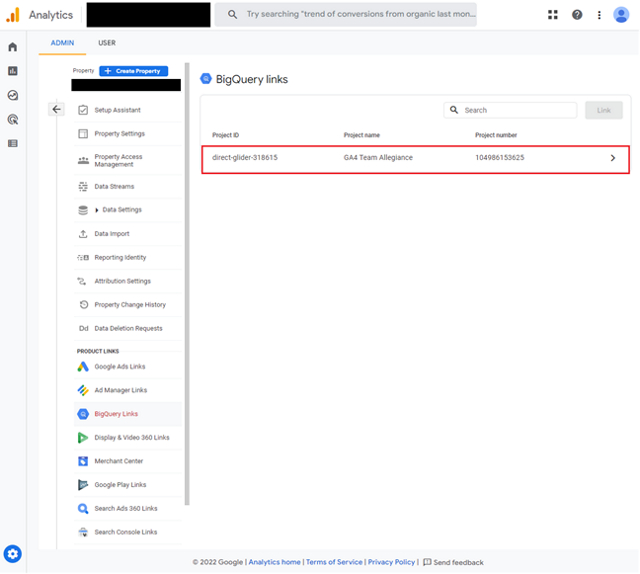
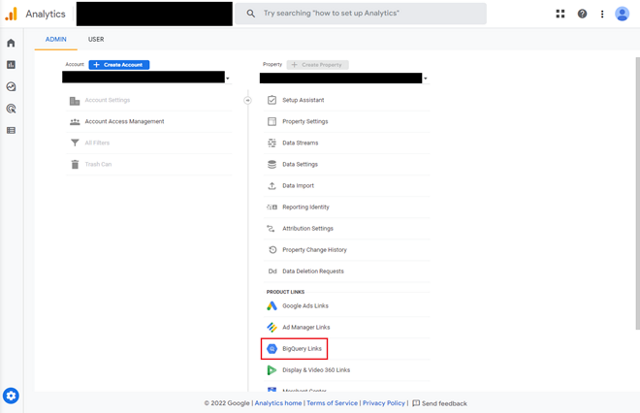
- Click on BigQuery Links under the property column of the Admin panel.

- Click on the project you want to update (should only be one).
- Click on the Streaming checkbox underneath the Frequency section and then click on the Save button.
- After about 24 hours, you should be able to see an extra data table in BiqQuery named “events_intraday”. This data table is real-time data and will disappear at the end of each day when the daily table above it is updated with the full days’ worth of data.

Add Users to BigQuery
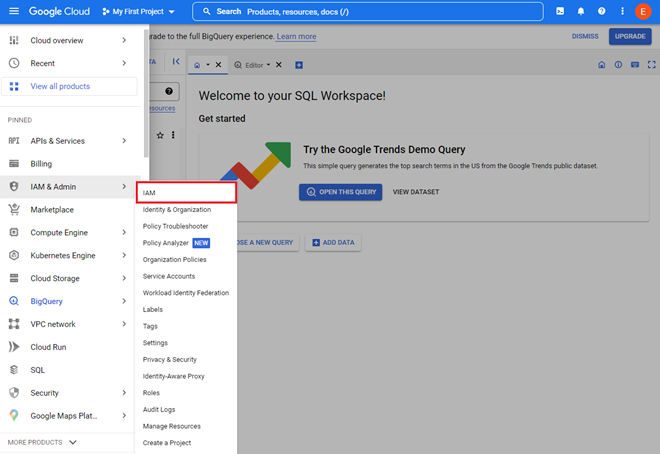
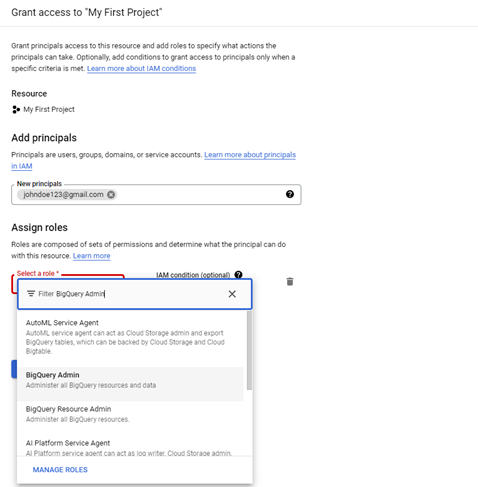
- Click the navigation button on the top left, hover over IAM & Admin, and then click on IAM.
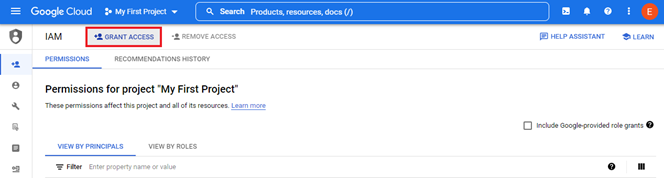
- Click on GRANT ACCESS at the top.
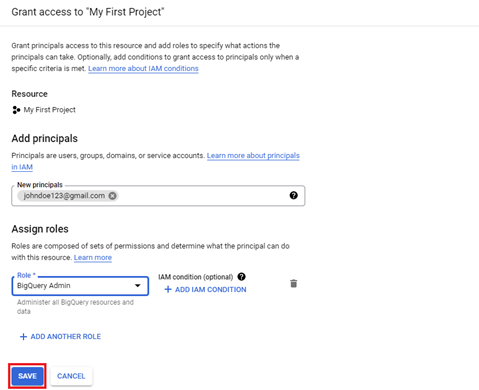
- Enter the email address of the new user, and assign them the role of BigQuery Admin. Allegiance Group + Pursuant will provide you with the email addresses of the analysts on your project.
- Click the SAVE button.
Link GA4 to BigQuery
- Before anything else, make sure you are using the same Google account you used to in the Google Cloud Platform in the above steps. If you’re unsure, click on the circular portrait at the top right of the page to confirm.

- From the home page of your GA4 property, click on the Admin “cog” at the bottom left of the page.
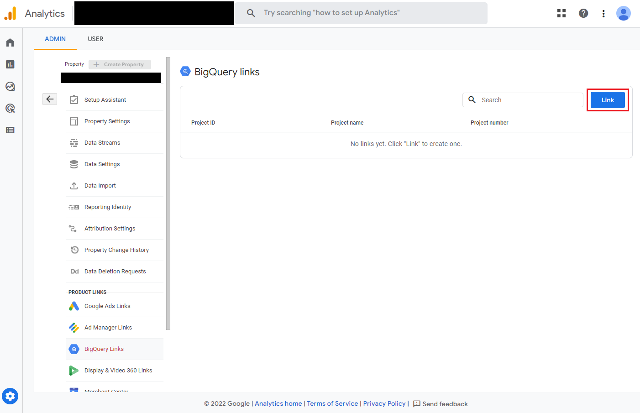
- Click on BigQuery Links under the property column of the Admin panel.
- Click on the Link button on the top right.
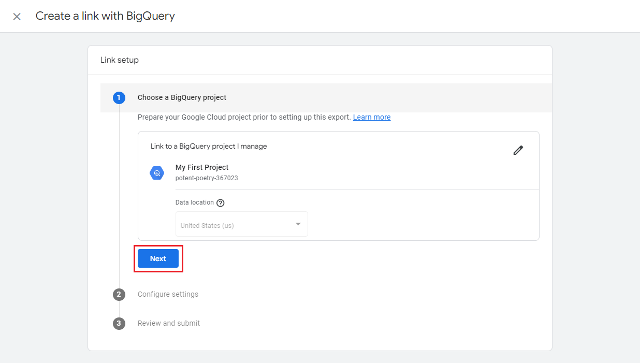
- Click on Choose a BigQuery project.

- If you are currently using the same Google account you used in the previous section, you should see your Project Name and Project ID. The Project name should be “My First Project” if you didn’t change its name. Click the checkbox for the correct project and then click the Confirm button.

- Click the Next button.
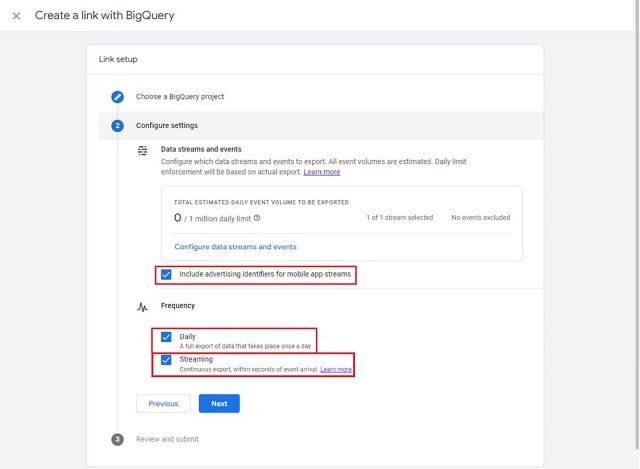
- Click on the following checkboxes:
- Include advertising identifiers for mobile app streams – this is for if you ever decide to connect an app stream.
- Daily (under Frequency) – This will export a daily table to BigQuery.
- Streaming (under Frequency) – This maintains a real-time data table for the current day. The data table will be deleted at the end of each day when the above “Daily” table is updated.
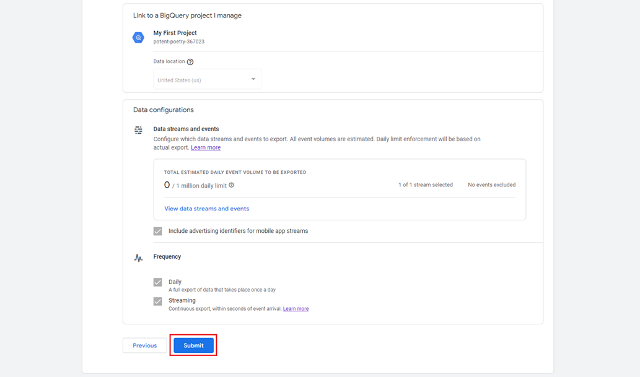
- This will be greyed out if you haven’t added a billing method. To enable this option, you must add billing information in case you surpass the free monthly limit in the BigQuery free tier. Adding billing info also allows you to keep your data longer than 60 days. See the previous section of the document for how to add billing information.
- Review and confirm all the information is correct. Once ready, click the Submit button.
- Now you should be all set and see a confirmation of LINK CREATED.
